Tennessee Mountain Stories

Quilt Repair Chronicle Week 4 Remembering Quilting Bees


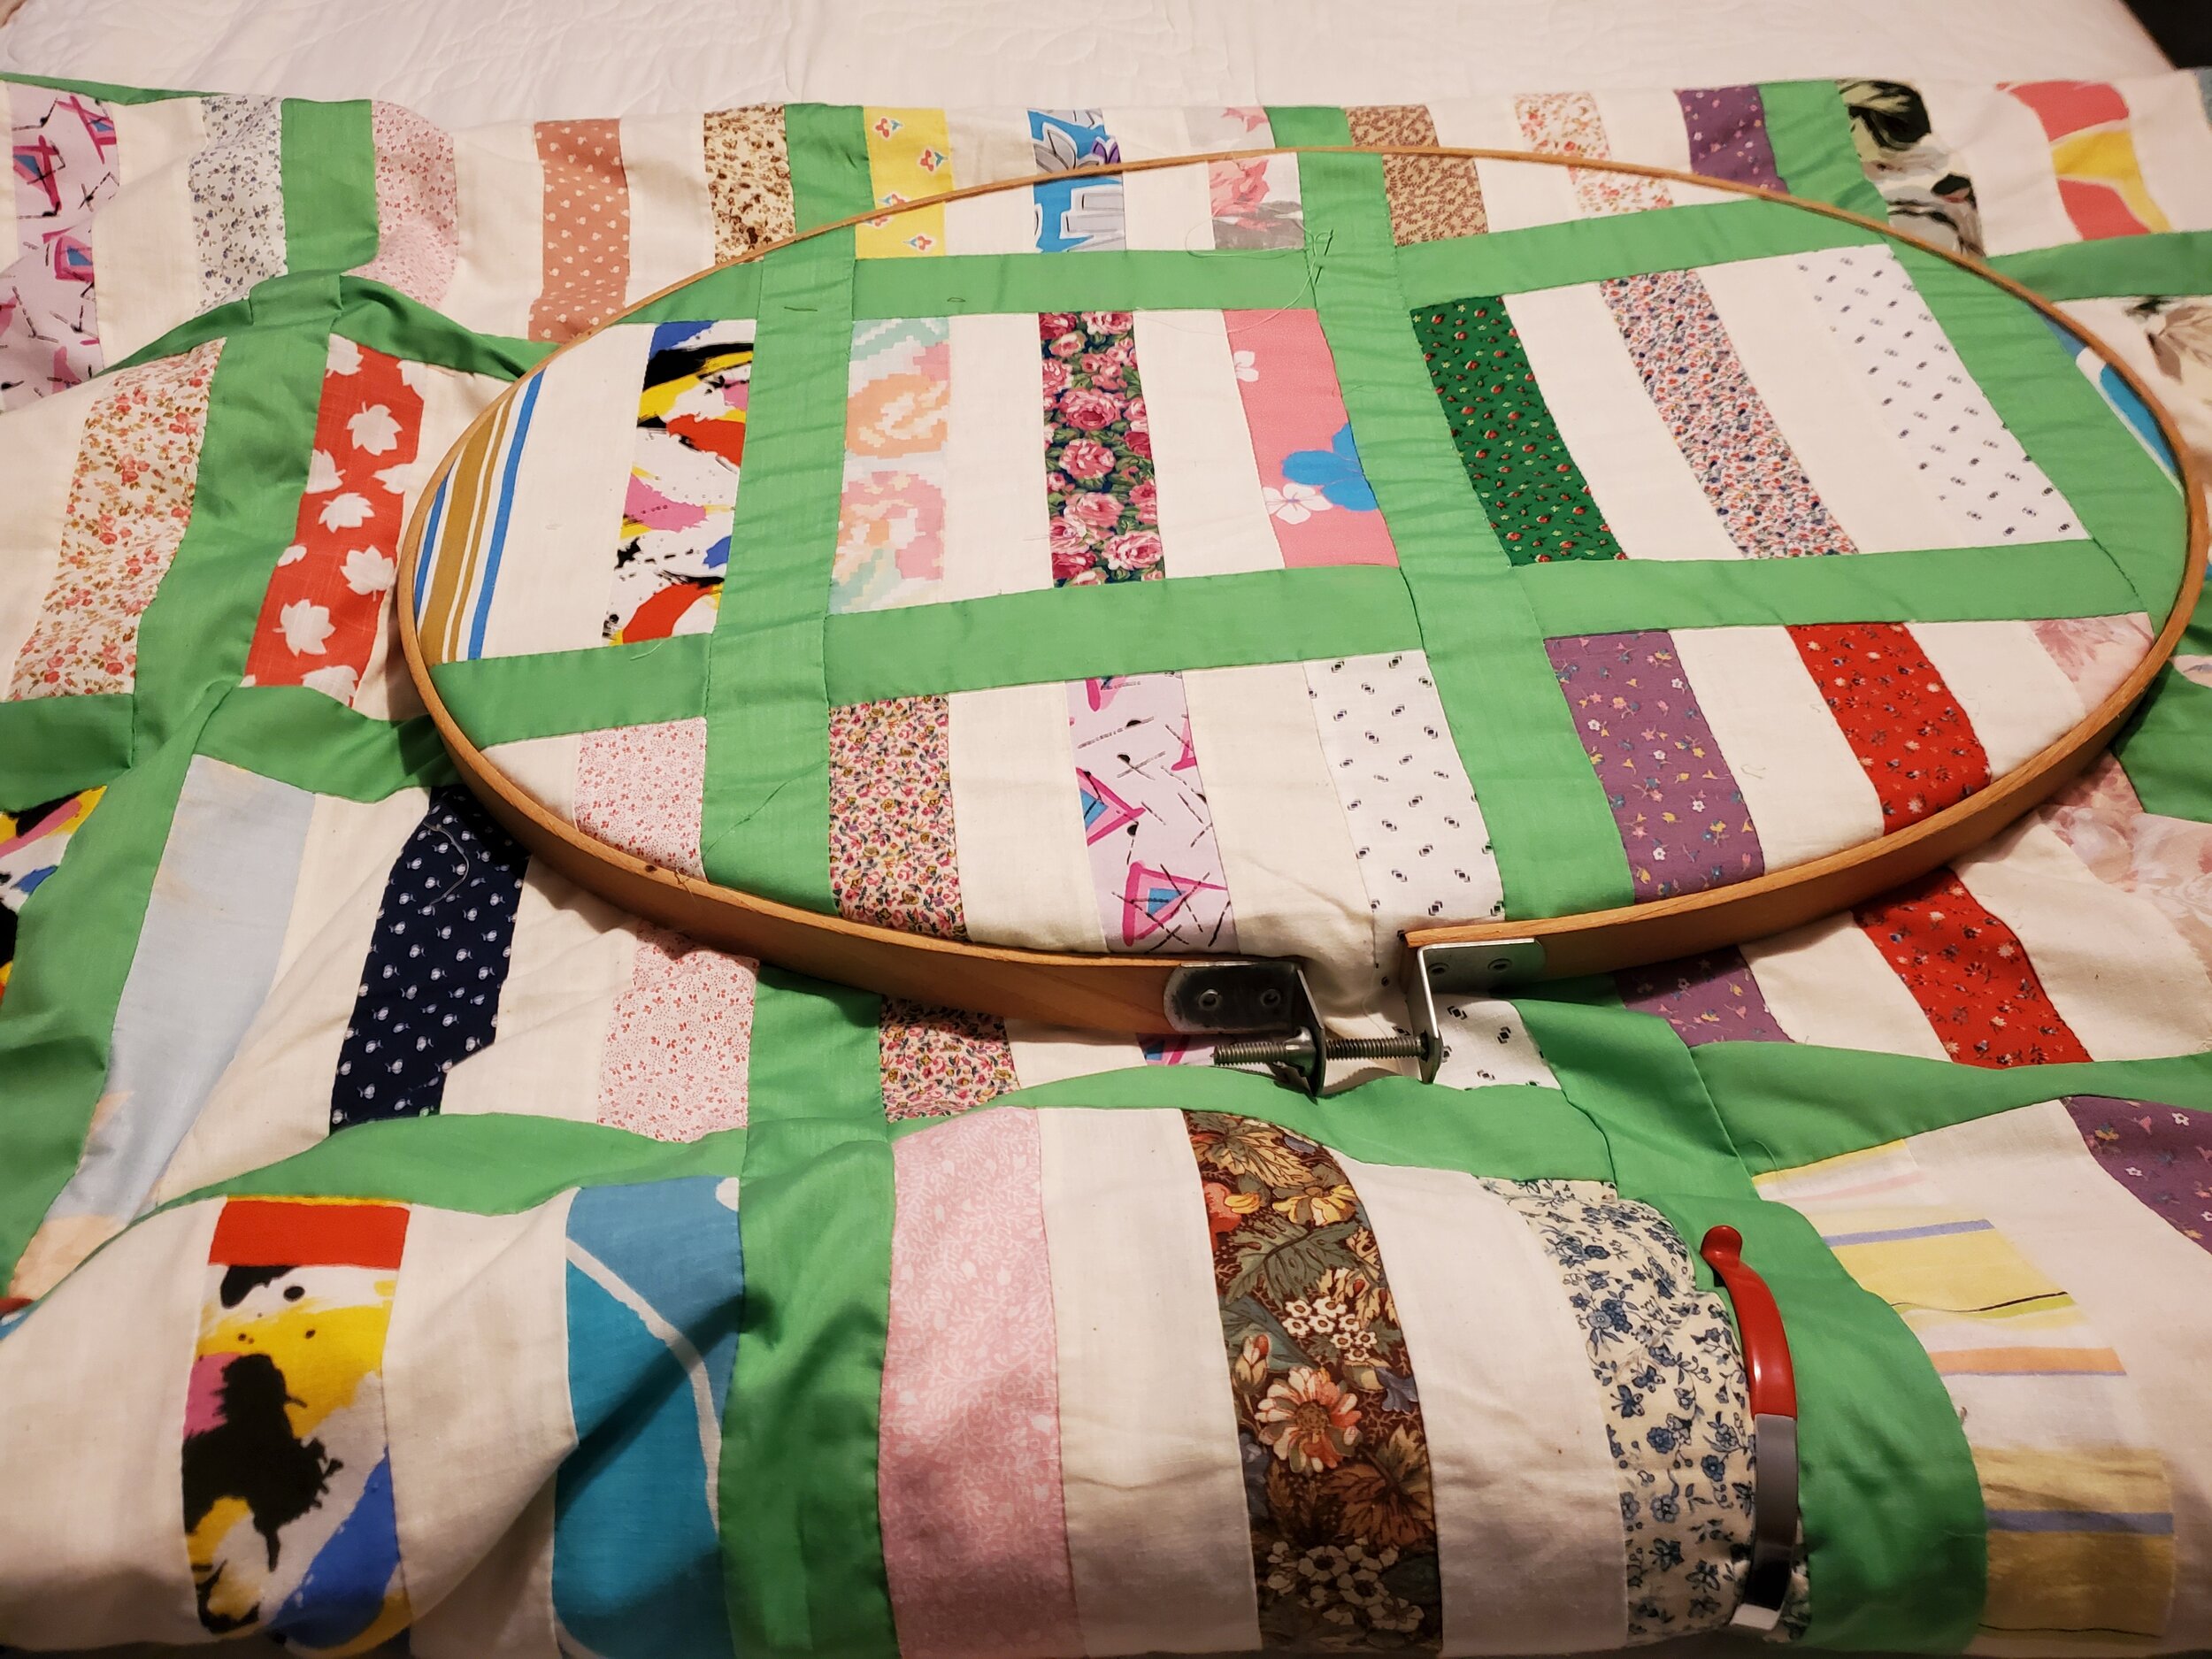
Every day or two I pickup my quilt and add another line if stitching. 

I was thinking about how often I’ve blogged about quilting from one perspective or another and wanted to remind you of a story I shared back in 2014.  This is the story of an unplanned quilting bee.  I’ve heard it many times through the years and I love the sense of community.   I’d welcome such an event about now!


Golda Stepp laid out the layers of her quilt and carefully smoothed the fabric.  As she tacked one end to the frame she wondered if she was starting this too early in the season.  You put a quilt up to work on when the weather is cool.  Summer months are filled with hoeing and canning.  Anyway, it’s hot in the summer and who wants to sit under the layers of a quilt inside the house when it’s hot?  Nonetheless Golda had a lovely quilt top that she was eager to finish and she had found a good quantity of unbleached domestic that made a fine backing so she would start this quilt today.

With the layers attached to one frame and the quilt rolled up as tightly as possible, she had just finished tacking the loose end to the remaining frame when she was called away by some inconsequential necessity of life, laundry or children or something like that. 

She was just finishing the housework when she heard a light knocking and a familiar voice calling, “Goldie, you home?”  Her husband’s aunt, Bessie Baldwin had stopped in for a quick visit. 

Coming through the front door, the quilt frame caught Aunt Bessie’ eye hung in the front bedroom.  “Oh, you’ve put up a quilt.  Do you want me to run a line for ya?”

Quilts have many purposes and warmth while sleeping may be the least of these.  The fellowship around a work-in-progress is priceless.  So the two ladies took seats on opposite sides of the quilting frame and began their work.  As needles flashed and straight lines of neat stitches inched their way behind them, Golda and Bessie caught up on the news of the family and the neighborhood.  Hours can be lost in such work and the morning was gone before they realized it.

Whether it was the lowing of a cow, or the laughter of the children, something prompted Bessie to take her first look at the clock.  “Well it’s half-past eleven.  I’ve got to go fix Rufus some dinner.  But I’ll be back as soon as he’s headed back to the field.  We’ll get some more work done on this quilt before supper.”

Golda smiled, having enjoyed the visit and happy to see the progress on her pretty quilt.  The Stepps would need their noon meal as well and so the quilt had to wait a couple of hours. 

It was not later than one o’clock when the happy chatter of not just one faithful quilter but four could be heard coming down the lane.  Bessie had met her younger sister, Gretchel Baldwin and enlisted her help for the afternoon.  Gretchel brought along her own daughter and a visiting girlfriend. 

Now there were five needles flashing, and three were very experienced quilters.  A full quilting frame might see a whole quilt finished in a day.  This quilt went from the very beginning stages to more than half finished before the visitors had to go home for the evening.  And everyone was pleased with both the visit and the work accomplished.


Repair Chronicle Week 3 New Week New Problems

Appliqued Cat quilt hiding behind simple Nine Patch Top

Appliqued Cat quilt hiding behind simple Nine Patch Top

When I undertook to blog on the process of repairing a vintage quilt, I forgot how SLOWLY I quilt!  Still I stitch on.

Right now it’s all about quilting this new top onto the existing top, batting (with some replacement pieces of batting) and the original backing.  This is a slow process for me in the best of conditions, largely because my Grandma Livesay has fussed so many times about people who quilt in long, sloppy stitches, and her voice rings in my head as I work.  Okay, there are a number of things from my childhood I’ve tried to outgrow and that lesson is one of the big ones. 

If you are willing to sit and put the work into making a whole quilt, I’m going to try very hard not to criticize the work you are doing.  Maybe I’m saying that because my quilting ain’t lookin’ too good on this one!

I am finding it very difficult to stitch through not just the extra layer of fabric but the thick, bunched-up old batting too.  That’s resulting in uneven stitches and many longer-than-desired stitches.

Tack Quilting

Tack Quilting

20200610_103123.jpg

I mentioned previously that I had to choose how to secure this new top onto the quilt and I chose against the “tack-quilting” option.  Here are some pictures of a quilt that was repaired by tacking on a new top.  I’ve peeled away a portion of the replacement top to reveal a beautiful appliqued cat quilt, with many holes and missing pieces. 

Take a look at the backing this practical quilter chose.  It’s two different fabrics that have been sewn together.  This is the preferred backing, but is common especially on old quilts because fabric wide enough to cover the entire width of a bed or quilt were rare and costly.  Do you notice that the fabric she chose hid the seam so well?  The top portion of fabric is printed as patchwork while the lower, brown fabric, is the added piece.  I suspect she had this fabric on hand, for if she’d bought it for this purpose, would have undoubtedly added another piece of the same print.

20200610_102035.jpg

Uncovering the mystery behind this Nine Patch top felt like a combination of Christmas morning and an archeological dig.  I didn’t know what I’d find or whether it would be at all salvageable yet I could hardly wait to see the quilt underneath.  I will certainly plan to repair this one someday – but I’d better finish the whole-cloth repair first, hadn’t I?

Quilt Repair Chronicle Week 2 Patches On

Quilt Frame.jpg

I’m slow.  Summer is a bad time to make a quilt.  There are lots of distractions… Okay there are LOTS OF EXCUSES!  I’m thinking my Grandma could’ve had this quilt repaired in a day, maybe two if there was other stuff going on.  And here I am wrapping up week two and I’ve not made much of a showing on it. 

After I decided I’d cover one side with a quilt top I already had on hand, I tried to choose the best side for patching – no sense in applying more patches than necessary, right?  I stitched on about 4 patches, using just a running stitch.  I plan to go back and add an applique stitch to secure those corners.  However, I’m trying not to wrestle it around more than necessary so after the patches were securely in place I’ve basted the new quilt top on.

Then there’s the question of quilting.  Of course I need to do this by hand – I may be handling it very delicately but I couldn’t expect a machine quilter to do the same, and anyway I don’t know that this old fabric would survive the whole process.  I have another old quilt that has been re-covered and that one was tack-quilted.  I’m afraid to try that in this case because there are a number of actual holes and I’m pretty sure I need to secure both the fabric and the new batting that I’m adding.

Speaking of batting, I’ve added batting under each of the patches and I have it basted in at the binding edge.  The original batting had really balled-up between the quilting and when the fabric wore through it was coming out like stuffing.  I’ve pulled out as much of the old batting as I could without causing further damage and I’m trying to replace that padding.

I have basted half of the quilt and have the other half carefully rolled and clamped.  I’ve quilted a could of lines, just moving along the green strips that join the patch strips.  We’ll see where I get to next week!


Quilt Repair Chronicle Week 1

Patches.jpg

Please recall from last week’s article that I’m undertaking to repair a nearly 70 year old quilt.  As with most of my projects, I have WAY underestimated the scope of this repair.  I find myself wondering what my grandmothers would’ve done if faced with this.  I doubt they would have had such a question because they would no doubt have conducted repairs along the way, instead of waiting until holes worked their way all the way through the quilt and batting poked its way out.

But I can’t go back – I say that a lot, you know.  You can never go back, you can only deal with what’s in front of you. 

Okay, first question – what to use for patches.  I don’t make my clothes, therefore I don’t create a whole lot of scraps.  And so many of the clothes we wear out are synthetic fabrics that don’t lend themselves to quilting. 

I kept remembering Matthew 9:16 that says, “No man putteth a piece of new cloth unto an old garment…” while I understand there is a deep spiritual lesson there about Jesus bringing a whole new age of grace and dispensing with the old age of the law, the literal meaning of his words seem to ring true in this situation.  It just so happens that I have a good supply of very old scraps – and I am so excited to tell you about these.

Domino Sugar Bag - it’s actually a creamy white, I’ve enhanced the photo to better highlight the faded brand name.

Domino Sugar Bag - it’s actually a creamy white, I’ve enhanced the photo to better highlight the faded brand name.

Back in 2016 I shared a story about my Great Aunt Willie Ward – she’d turned 100 years old in that article.  Aunt Willie was of a generation that despised waste.  She saved everything and found a use for most things.  Every time we went to Aunt Willie’s house, she tried to send us home with a car load of the stuff she’d saved.  These scraps came from her. 

There are cloth bags, even a scrap of a Domino sugar bag.  There is unbleached Domestic fabric (I think this is commonly known as muslin, however, it is always called domestic on the mountain and is a common quilting fabric).  Domestic fabric came in various grades of quality and thickness and I have several examples.

I don’t know quite what I’m going to use those bags for, but I couldn’t bring myself to cut them up for patches so I’ve opted for the Domestic.

Replacement Top over Whole Cloth Quilt

Replacement Top over Whole Cloth Quilt

Aunt Willie also gifted me with several quilt tops – these are pieced tops that have never been quilted.  So that was a great option to cover one side of this quilt.  And it’s a very old means of salvaging a worn quilt.  In fact, I have another project waiting in the wings which is an appliqued cat quilt which wore out and was covered with a simple patchwork top and tack-quilted.  That one came from my husband’s family in Georgia. 

I especially love using one of Aunt Willie’s quilt tops on this project because it’s just the sort of thing she would’ve done.

Finally there’s the binding around the edge of the quilt.  This had apparently been replaced because it was  a poly-cotton blend of fabric which is too modern for this quilt.  Also, it is in really good condition, and the binding is usually the first part of a quilt to wear out.  As I began looking at the machined stitches that attached it, they were tight and sound while the surrounding fabric was loose and worn so I opted to just cut it away and save more of the original fabric.

And while it seems precious little, that’s my progress for the week!  I have patches cut and pinned in place; I’ve located and sized the replacement top and cleaned out the lumpy batting the surrounded the tears and edges.   We’ll see where we get to next week…

New Life for Old Covers

A couple of times I’ve written a little about quilts and quilting.  While I learned to quilt at my grandmothers’ knees, I make no claim of expertise.  In fact, I have a dear friend who is in fact an expert at the craft and she’d probably tell you I know nothing about real quilting.  I wouldn’t argue with her.

Quilt to Repair.jpg

Yet, I’m working on a project and I’d like to share it with you over the next few weeks and we’ll see if I can actually accomplish it.  You see, I have a treasured old scrap that I hope to revive somewhat. 

I think the birth of quilts must have come from an abundance of scraps.  Scrap pieces of Lou’s new Sunday dress, Papa’s new shirt and little Ben’s worn out overalls.  Just because the back side got all ripped as a young boy skidded down a hillside, doesn’t mean the rest of the pants should be thrown out!  Fabric was one of those scarce resources on the Plateau – a land not inclined to grow cotton, made for a people dependent on store-bought yardage and that meant money.  There was precious little of that. 

Every scrap was saved, every scrap found a use, eventually.

I have seen quilts made of double knit polyester – those quilter friends of mine may be in need of medical help after reading that statement.  The color fast scraps from 1970’s dresses and pants suits made for a heavy quilt, but, gracious it was warm. 

I’ve shared with you here the quilt my Great Grandmother made of her Mother’s dresses.

I’m a fan of whole cloth quilts – probably because I’d much rather quilt than piece.  But getting a piece of fabric that large has historically been pricey. 

The quilt I’ve pictured here is whole cloth front and back – the same cloth.  As far as I know, it started out as a bedroom door.  Did you ever see an old house with curtains for doors?  A tour guide at an old house once told me that property taxes at one time were based on the number of doors ( I guess that was a way of counting the number of rooms in your house) so doors were only added where absolutely necessary – and that’s one explanation for why old homes never had closets.  Look at the picture, is that a fabric pattern you would choose to decorate your home? 

About 1958 my Great Grandma took the curtains and made them into a quilt which the family would use it until 1970 when it was passed on to my mother.  I remember using this quilt all the time I was at home.  And now I have it.    

After more than 60 years of constant use as a quilt made from old fabric, you can see that it’s showing some age.

As we’ve often discussed here on The Stories, recycling and repurposing are a way of life on the mountain.  Quilts have always been recycled.  Now, I don’t know that I’ve ever actually seen patches on quilts – but then most quilts are patchwork so would you even know if it had received a new patch?

Another way to repurpose a worn quilt is to give it a new cover.  When batting was hard to come by, using a worn quilt as the center layer on a new project is a pretty good idea.  Sometimes you can learn a lot of history when an old quilt tears – because the gash may reveal an interesting batting.

I may try that to add a whole new layer on one side of this project.  However, there are a couple of holes that go through all three layers of the quilt, so there’s no way around adding some true patching.

While my expert-quilter-friend told me this quilt wasn’t worth repairing, I think the biggest obstacle is in the batting.  Old batting was pure cotton that wanted to wad up.  You may notice that antique quilts are usually quilted in very close rows or grids – that’s to bind that batting down as much as possible.  Today’s quilts can be fluffier quilted on a much larger framework because the batting will hold up so much better.  (Of course we’ll have to wait another 60 or 70 years to see what today’s quilts look like when they’re as old as this one!)

If you have any advice for me, I’m happy to hear it – just click “comments” below!